> ## Documentation Index
> Fetch the complete documentation index at: https://docs.flexoworks.com/llms.txt
> Use this file to discover all available pages before exploring further.
# Install the CDI agent
> Install the Windows agent, connect it to Flexoworks, and check its diagnostic logs.
Install **Flexoworks CDI Agent** on the Windows workstation that can reach
your CDI and read the DFS folders. It runs as a background Windows service,
connects to Flexoworks over outbound HTTPS, and sends status and diagnostic
logs to **Organization → CDI agents**.
This guide covers the **0.2.1 MSI installer**. The cloud screenshots use a demo
workstation. The Windows screenshots show the actual setup application on
Windows Server 2022; the window frame may look different on Windows 11.
The agent currently supports diagnostics and LEN package preparation.
Installing it does not enable automatic exposure or direct CDI queue
submission. Continue submitting jobs through DFS as described in the
[CDI workspace guide](/guides/cdi-workspace).
## Before you start
* A **64-bit Windows 11** workstation on the DFS/CDI network and permission
to install software as a Windows administrator.
* A Flexoworks account with the **Org admin** role and the CDI equipment
already listed in **Organization → Locations & equipment**.
* The CDI hostname or IP address used by DFS. Copy it from
**DFS → Edit Device List**; the agent does not scan the whole network.
* The exact DFS folders to inspect and permission for the Windows service
account to read them. The operator can help identify these folders.
* Outbound HTTPS access to the Flexoworks API and file storage for downloads
and evidence uploads. The cloud connection does not require an inbound
internet port or a VPN. The workstation still needs local network access
to the CDI and DFS shares.
The package includes its own runtime. You do not need to install PowerShell,
a compiler, or a separate .NET runtime.
This pilot installer is unsigned. If company policy blocks the MSI or
application, ask site IT to approve the package. Keep the exact Windows
message and error code; disabling Windows security is not an installation step.
## 1. Download the installer and configuration
Open **Organization → CDI agents** in Flexoworks and select
**Download Windows agent**. Save `Flexoworks-CDI-Agent.zip` so you can
transfer it to the Windows workstation.
Expand **Add workstation** and fill in:
| Field | What to enter |
| - | - |
| **Workstation name** | A recognizable name, such as `DFS workstation 1`. |
| **Equipment** | The CDI equipment this workstation will connect to. |
| **CDI hostname or IP** | The device address from DFS, without `http://`, a port, or a folder path. |
| **DFS folders to capture** | One full folder path per line. Use UNC paths for network folders. You can add or correct these in the Windows setup window later. |
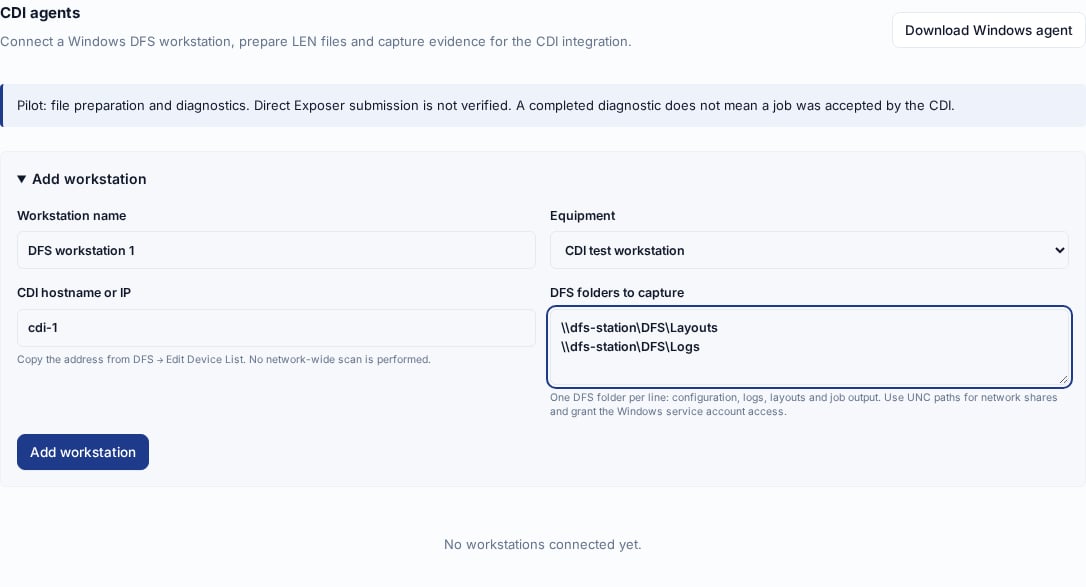 Select **Add workstation**, then **Download agent.json**. Transfer both the
ZIP and `agent.json` to the Windows workstation. Download the configuration
before refreshing or leaving this page: its download is available only during
the current setup session.
Select **Add workstation**, then **Download agent.json**. Transfer both the
ZIP and `agent.json` to the Windows workstation. Download the configuration
before refreshing or leaving this page: its download is available only during
the current setup session.
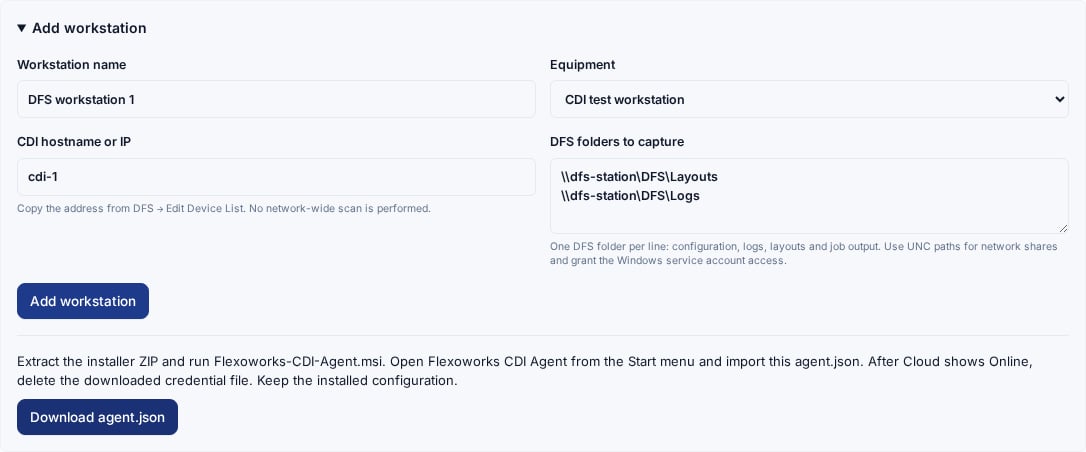 The downloaded `agent.json` contains a workstation credential. Do not put it
in shared documentation or attach it to a support request. Each workstation
needs its own configuration; do not reuse one file on several computers.
## 2. Install the MSI on Windows
1. Close any older portable agent window on this computer.
2. In File Explorer, extract `Flexoworks-CDI-Agent.zip`.
3. Double-click **Flexoworks-CDI-Agent.msi** in the extracted folder.
4. Follow the installer, keep the default installation folder, and approve
the Windows administrator prompt when it appears.
5. Open **Start → Flexoworks → Flexoworks CDI Agent** after installation.
Opening the setup application also requires administrator permission.
The installer registers and starts the **Flexoworks CDI Agent** service.
The service creates its own `Data` folders; do not create them manually.
Before pairing, a waiting-for-configuration or starting status is expected.
## 3. Import the configuration
Choose **English** or **Українська** using the selector at the bottom of the
setup window. Select **Import configuration…**, open the downloaded
`agent.json`, and acknowledge the confirmation.
The downloaded `agent.json` contains a workstation credential. Do not put it
in shared documentation or attach it to a support request. Each workstation
needs its own configuration; do not reuse one file on several computers.
## 2. Install the MSI on Windows
1. Close any older portable agent window on this computer.
2. In File Explorer, extract `Flexoworks-CDI-Agent.zip`.
3. Double-click **Flexoworks-CDI-Agent.msi** in the extracted folder.
4. Follow the installer, keep the default installation folder, and approve
the Windows administrator prompt when it appears.
5. Open **Start → Flexoworks → Flexoworks CDI Agent** after installation.
Opening the setup application also requires administrator permission.
The installer registers and starts the **Flexoworks CDI Agent** service.
The service creates its own `Data` folders; do not create them manually.
Before pairing, a waiting-for-configuration or starting status is expected.
## 3. Import the configuration
Choose **English** or **Українська** using the selector at the bottom of the
setup window. Select **Import configuration…**, open the downloaded
`agent.json`, and acknowledge the confirmation.
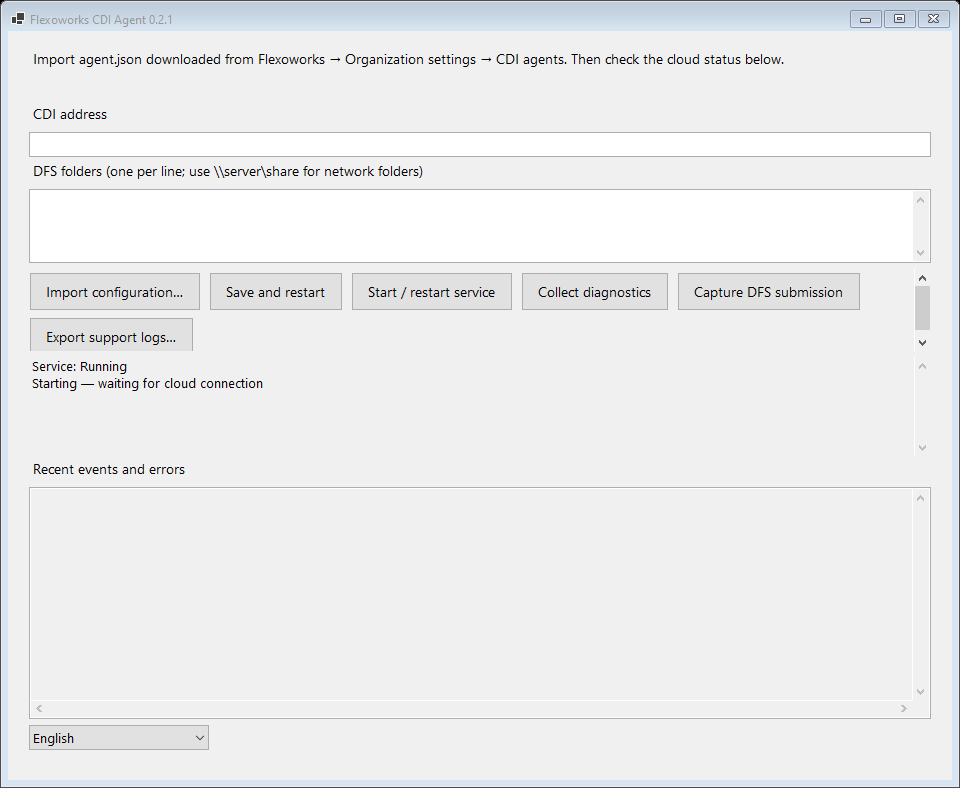 Importing saves the configuration and restarts the service. The installed
credential is protected with Windows machine encryption. Check the **CDI
address** against **CDI hostname or IP** for the selected workstation in the
cloud: the values must match exactly. You can edit **DFS folders** locally
and select **Save and restart** to apply those folder changes.
### Change the CDI address
**Save and restart** changes only the local configuration. It does not update
the address in the cloud registration. If the two addresses differ, cloud
commands fail with `CDI_HOST_MISMATCH`, even while the workstation shows
**Online**.
If you accidentally edited only the local address and the cloud address is
still correct, restore the exact cloud value in **CDI address** and select
**Save and restart**. Then request diagnostics again.
If the device address has changed or the cloud address is wrong:
1. Let active diagnostics, file preparation, and evidence uploads finish.
2. In **Organization → CDI agents**, select the old workstation and choose
**Revoke access**.
3. Use **Add workstation** to register a replacement with the same equipment,
the correct CDI address, and the required DFS folders. Download its new
`agent.json` before leaving the page.
4. On the same Windows computer, select **Import configuration…** and import
the new file. This replaces the local configuration and restarts the service;
reinstalling the MSI is unnecessary.
5. Select the replacement workstation in the cloud, verify **Online**, and
run **Collect diagnostics**. Delete the downloaded configuration after
verifying the connection.
## 4. Check DFS folders and service access
Ask the operator to show where DFS keeps saved layouts, configuration,
logs, and job output. Use the folders from this installation; there is no
single default path for every DFS station.
For a mapped network drive, use its underlying UNC path. For example, if
`Z:` maps to `\\dfs-station\DFS`, enter `\\dfs-station\DFS\Layouts`
instead of `Z:\Layouts`. Enter one folder per line and select only the
folders needed for capture, rather than an entire drive.
The service runs as **LocalSystem** by default. A folder you can open in
File Explorer may still be inaccessible to that service. Ask IT to grant the
service identity access or configure an appropriate account in Windows
Services. After an account change, open the agent setup as administrator
before starting the service so its local data permissions are updated. Do not
put network passwords in paths. A custom service account also needs the
Windows permissions required for network capture.
## 5. Verify the connection and diagnostics
1. In Windows, wait for **Service: Running** and
**Cloud: Connected to Flexoworks**. A running service alone does not confirm
a working cloud connection.
2. Return to **Organization → CDI agents** and choose the new **Workstation**.
3. Check **Online**, a recent **Last contact**, and **Agent version 0.2.1**
or the newer version you installed. The page refreshes automatically.
4. Select **Collect diagnostics**. Watch **Recent commands** and
**Diagnostic log**. Expand events for details; use **Warnings and errors**
to focus on failures.
5. Confirm that the configured DFS folders are accessible to the service.
Inspect the CDI connectivity results and download the ZIP under
**Evidence bundles** when it appears.
**Online** confirms that the agent has contacted Flexoworks. A successful
candidate-port check confirms only that a network endpoint responded.
**Diagnostics completed** does not mean the CDI accepted or exposed a job.
After verifying the connection, delete the downloaded plaintext `agent.json`
and any transfer copies. Keep the installed configuration in
`C:\ProgramData\FlexoworksCdiAgent`.
The service starts automatically after Windows restarts, before user sign-in.
You can close the setup window while the service keeps running; reopen it
from Start when needed. At a convenient time, restart the workstation and
verify a fresh **Last contact** in Flexoworks.
## Capture one DFS submission
Once the connection and folder access work, coordinate a known test job with
the operator:
1. Select **Capture DFS submission** in the cloud or Windows setup window
and confirm the request.
2. Wait for **Capture ready — send the test job through DFS now** in the
cloud log, or `CAPTURE_READY` in the Windows log.
3. Have the operator submit that one test job through the existing DFS workflow.
4. Let the 120-second capture finish. Download its ZIP from **Evidence bundles**.
The capture records traffic to the configured CDI and changes in selected
DFS folders. Packet traces can contain job data and credentials; share the
private archive only with people investigating the integration. If the service
is stopped during capture, version 0.2.1 saves partial evidence and queues its
upload for restart. The interrupted command requires review and is not replayed.
## If something does not work
| What you see | What to do |
| - | - |
| The installer is blocked or administrator access is denied | Save the exact message and ask site IT to approve the MSI and application. |
| **Waiting for configuration** | Import the correct `agent.json`. If it was lost before import, revoke the unused cloud entry and add a replacement workstation. |
| **Service: Stopped** | Select **Start / restart service** and inspect recent errors if it stops again. |
| **Cannot reach Flexoworks** or cloud **Offline** | Check outbound access, DNS, proxy or firewall policy, and the Windows window's error. Local logs remain available while offline. |
| **Access revoked** | Create a replacement workstation configuration and import it on this computer. |
| `CDI_HOST_MISMATCH` in a failed command | The local and cloud CDI addresses differ. Restore the exact registered address locally, or follow the address-change steps above to replace an incorrect cloud registration. Then request diagnostics again. |
| A DFS folder is unavailable | Check the full UNC path and service account permissions, then collect diagnostics again. |
| CDI address resolution or candidate-port checks fail | Recheck the address in DFS and local connectivity with the operator or IT. Do not change production device settings based only on a candidate-port result. |
| Network capture is unavailable | Export logs for IT to check capture permissions or another active trace. Folder diagnostics may still be available. |
### Export logs
Select **Export support logs…** in the Windows window. The ZIP includes
recent agent events, status, available startup errors, and the recorded MSI
installation log. Text logs are redacted; raw packet capture bundles are separate.
If setup cannot open, IT can use **Command Prompt** as administrator:
```bat theme={null}
"C:\Program Files\Flexoworks CDI Agent\FlexoworksCdiAgent.exe" --export-support "%USERPROFILE%\Desktop\Flexoworks-support.zip"
```
This works even if the agent cannot create its primary `Data` folder.
Startup errors may also be in `%TEMP%\FlexoworksCdiAgent`,
`C:\Windows\SystemTemp\FlexoworksCdiAgent`, or the older
`C:\Windows\Temp\FlexoworksCdiAgent` location.
For an installation failure, run the MSI from its extracted folder with a
known log filename:
```bat theme={null}
msiexec /i "Flexoworks-CDI-Agent.msi" /L*V "%TEMP%\Flexoworks-install.log"
```
Send support the exact error, installer version, this MSI log or support
ZIP, and approximate time of failure. Do not send `agent.json`.
## Update, repair, or remove
Install a newer MSI on the same computer to update the agent; it does not
self-update. Configuration and evidence are retained. Afterward, check the
version and fresh cloud contact again. Repair or uninstall through Windows
**Installed apps** when needed. Uninstalling preserves configuration and
evidence in `C:\ProgramData\FlexoworksCdiAgent`; it does not revoke cloud access.
Use **Revoke access** in Flexoworks when retiring a workstation.
This documentation is built and hosted on [Mintlify](https://mintlify.com), a developer documentation platform.
Importing saves the configuration and restarts the service. The installed
credential is protected with Windows machine encryption. Check the **CDI
address** against **CDI hostname or IP** for the selected workstation in the
cloud: the values must match exactly. You can edit **DFS folders** locally
and select **Save and restart** to apply those folder changes.
### Change the CDI address
**Save and restart** changes only the local configuration. It does not update
the address in the cloud registration. If the two addresses differ, cloud
commands fail with `CDI_HOST_MISMATCH`, even while the workstation shows
**Online**.
If you accidentally edited only the local address and the cloud address is
still correct, restore the exact cloud value in **CDI address** and select
**Save and restart**. Then request diagnostics again.
If the device address has changed or the cloud address is wrong:
1. Let active diagnostics, file preparation, and evidence uploads finish.
2. In **Organization → CDI agents**, select the old workstation and choose
**Revoke access**.
3. Use **Add workstation** to register a replacement with the same equipment,
the correct CDI address, and the required DFS folders. Download its new
`agent.json` before leaving the page.
4. On the same Windows computer, select **Import configuration…** and import
the new file. This replaces the local configuration and restarts the service;
reinstalling the MSI is unnecessary.
5. Select the replacement workstation in the cloud, verify **Online**, and
run **Collect diagnostics**. Delete the downloaded configuration after
verifying the connection.
## 4. Check DFS folders and service access
Ask the operator to show where DFS keeps saved layouts, configuration,
logs, and job output. Use the folders from this installation; there is no
single default path for every DFS station.
For a mapped network drive, use its underlying UNC path. For example, if
`Z:` maps to `\\dfs-station\DFS`, enter `\\dfs-station\DFS\Layouts`
instead of `Z:\Layouts`. Enter one folder per line and select only the
folders needed for capture, rather than an entire drive.
The service runs as **LocalSystem** by default. A folder you can open in
File Explorer may still be inaccessible to that service. Ask IT to grant the
service identity access or configure an appropriate account in Windows
Services. After an account change, open the agent setup as administrator
before starting the service so its local data permissions are updated. Do not
put network passwords in paths. A custom service account also needs the
Windows permissions required for network capture.
## 5. Verify the connection and diagnostics
1. In Windows, wait for **Service: Running** and
**Cloud: Connected to Flexoworks**. A running service alone does not confirm
a working cloud connection.
2. Return to **Organization → CDI agents** and choose the new **Workstation**.
3. Check **Online**, a recent **Last contact**, and **Agent version 0.2.1**
or the newer version you installed. The page refreshes automatically.
4. Select **Collect diagnostics**. Watch **Recent commands** and
**Diagnostic log**. Expand events for details; use **Warnings and errors**
to focus on failures.
5. Confirm that the configured DFS folders are accessible to the service.
Inspect the CDI connectivity results and download the ZIP under
**Evidence bundles** when it appears.
**Online** confirms that the agent has contacted Flexoworks. A successful
candidate-port check confirms only that a network endpoint responded.
**Diagnostics completed** does not mean the CDI accepted or exposed a job.
After verifying the connection, delete the downloaded plaintext `agent.json`
and any transfer copies. Keep the installed configuration in
`C:\ProgramData\FlexoworksCdiAgent`.
The service starts automatically after Windows restarts, before user sign-in.
You can close the setup window while the service keeps running; reopen it
from Start when needed. At a convenient time, restart the workstation and
verify a fresh **Last contact** in Flexoworks.
## Capture one DFS submission
Once the connection and folder access work, coordinate a known test job with
the operator:
1. Select **Capture DFS submission** in the cloud or Windows setup window
and confirm the request.
2. Wait for **Capture ready — send the test job through DFS now** in the
cloud log, or `CAPTURE_READY` in the Windows log.
3. Have the operator submit that one test job through the existing DFS workflow.
4. Let the 120-second capture finish. Download its ZIP from **Evidence bundles**.
The capture records traffic to the configured CDI and changes in selected
DFS folders. Packet traces can contain job data and credentials; share the
private archive only with people investigating the integration. If the service
is stopped during capture, version 0.2.1 saves partial evidence and queues its
upload for restart. The interrupted command requires review and is not replayed.
## If something does not work
| What you see | What to do |
| - | - |
| The installer is blocked or administrator access is denied | Save the exact message and ask site IT to approve the MSI and application. |
| **Waiting for configuration** | Import the correct `agent.json`. If it was lost before import, revoke the unused cloud entry and add a replacement workstation. |
| **Service: Stopped** | Select **Start / restart service** and inspect recent errors if it stops again. |
| **Cannot reach Flexoworks** or cloud **Offline** | Check outbound access, DNS, proxy or firewall policy, and the Windows window's error. Local logs remain available while offline. |
| **Access revoked** | Create a replacement workstation configuration and import it on this computer. |
| `CDI_HOST_MISMATCH` in a failed command | The local and cloud CDI addresses differ. Restore the exact registered address locally, or follow the address-change steps above to replace an incorrect cloud registration. Then request diagnostics again. |
| A DFS folder is unavailable | Check the full UNC path and service account permissions, then collect diagnostics again. |
| CDI address resolution or candidate-port checks fail | Recheck the address in DFS and local connectivity with the operator or IT. Do not change production device settings based only on a candidate-port result. |
| Network capture is unavailable | Export logs for IT to check capture permissions or another active trace. Folder diagnostics may still be available. |
### Export logs
Select **Export support logs…** in the Windows window. The ZIP includes
recent agent events, status, available startup errors, and the recorded MSI
installation log. Text logs are redacted; raw packet capture bundles are separate.
If setup cannot open, IT can use **Command Prompt** as administrator:
```bat theme={null}
"C:\Program Files\Flexoworks CDI Agent\FlexoworksCdiAgent.exe" --export-support "%USERPROFILE%\Desktop\Flexoworks-support.zip"
```
This works even if the agent cannot create its primary `Data` folder.
Startup errors may also be in `%TEMP%\FlexoworksCdiAgent`,
`C:\Windows\SystemTemp\FlexoworksCdiAgent`, or the older
`C:\Windows\Temp\FlexoworksCdiAgent` location.
For an installation failure, run the MSI from its extracted folder with a
known log filename:
```bat theme={null}
msiexec /i "Flexoworks-CDI-Agent.msi" /L*V "%TEMP%\Flexoworks-install.log"
```
Send support the exact error, installer version, this MSI log or support
ZIP, and approximate time of failure. Do not send `agent.json`.
## Update, repair, or remove
Install a newer MSI on the same computer to update the agent; it does not
self-update. Configuration and evidence are retained. Afterward, check the
version and fresh cloud contact again. Repair or uninstall through Windows
**Installed apps** when needed. Uninstalling preserves configuration and
evidence in `C:\ProgramData\FlexoworksCdiAgent`; it does not revoke cloud access.
Use **Revoke access** in Flexoworks when retiring a workstation.
This documentation is built and hosted on [Mintlify](https://mintlify.com), a developer documentation platform.